The first time I worked with hexagon tiles was in the 1970’s – I was a dungeon master for a D&D group and I ran out of “normal” graph paper and somehow wound up with hexagonal graph paper to draw out a dungeon with. It looked cool, but it was hard to draw out a straight hallway unless you went with the “flat hexagon sides”. It didn’t lend itself well to the dungeon mastering experience (“You’re walking down a dark hallway when you hit an intersection – you can keep going straight or you can turn 45-ish degrees to your left-forward or 45-ish degrees to your backwards right”).
40 years later, board games and apps are predominantly hexagonally driven. Hexagons lend themselves better to “natural” shapes, bending rivers, rounded bottoms of mountains, etc… The traditional square grid pattern is largely relegated to “legacy support” of old chess and checker boards. However, there is one really important point to make about the tried and true square checker pattern:
Its really easy to work with – like CRAZY easy.
– Aaron
People use hexagons and squares for a really basic reason – they are two of the three shapes that tesselate properly (the third is triangles, but, if you’re building a grid with triangles, you’re weird and we’re not going to talk about them here). Tessellation is the notion that some shapes can be evenly repeated in a pattern with no empty spaces – you can read a good article about it here: https://mathworld.wolfram.com/Tessellation.html. Most shapes do not tessellate well or they only tessellate with some amount of distortion. This is why most grids in the world are based on squares or hexagons – they both tessellate very well and they are not triangles 🙂
Why are squares easier to work with than hexagons? Simple: their shape matches a standard coordinate system. Take any given square – to get the next one up, add one to your Y axis – next one down, take away one from your Y axis, add one to X to go over one way, subtract one from X to go the other. Easy peasy. There’s a reason people have been using square grids for hundreds of years.
Hexagons do not work that way. Depending on how you have them oriented, the next hexagon over in a grid might be X+1, or X+.66 and Y-1, or Y+1 and X-.5, and so on. What a pain in the butt. There’s a really cool article here https://www.redblobgames.com/grids/hexagons/ reviewing hexagon navigation theory – its a great article.
As an individual app developer, I have to make my world manageable. Reading someone tell me that I might want to consider adopting a 3-dimensional coordinate system to properly navigate my a 2-dimensional grid (which, by the way, exists in a 3-dimensional game space) makes me want to go crying back to squares. So I spent some time working on this, googled a lot, and worked out a collider-based solution to hexagonal navigation – that’s right – no axial coordinates or cubed numbering systems – just plain old Unity stuff.
Lets say you’re generating your own hexagonal grid and you want to make it so each tap highlights every contiguous hexagon for two hexagons out. However, the grid is non-contiguous – it has “land areas” and “water areas” and the contiguous space should not cross the water even though there is more land within that two hex radius:

If you add colliders to each hexagon as you lay them out (each one in this case is its own prefab), then you can superimpose a geometric figure that represents a radius that would constitute all neighboring tiles – in our case that super-imposed geometry is an OverlapSphere:
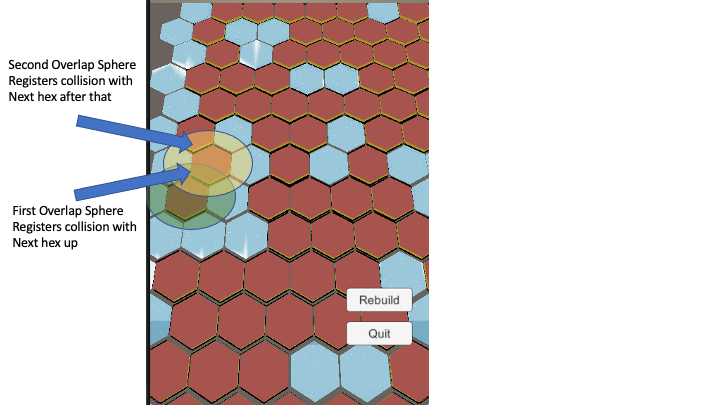
Each overlap sphere is only big enough to touch the directly neighboring tiles. Then you can evaluate those neighboring tiles to see if they are acceptable to highlight and you can repeat the process, effectively “stepping your way” through tiles evaluating neighbors for as many iterations / depth as you wish.
// source is the vector3 representing the starting tile;
// 1 is the radius - you might need to adjust based on
// the size of your hexagons
Collider[] hitColliders = Physics.OverlapSphere(source, 1);
foreach (var hit in hitColliders){
// you can now get hit.transform and do
// whatever you need to evaluate if this
// is a valid tile to highlight;
// if you also take hit.transform.position and
// feed it back into Physics.OverlapSphere
// you can repeat the process and get further
// neighbors - turn it into a function and call
// it recursively if you want (watch out for
// endless looping!)
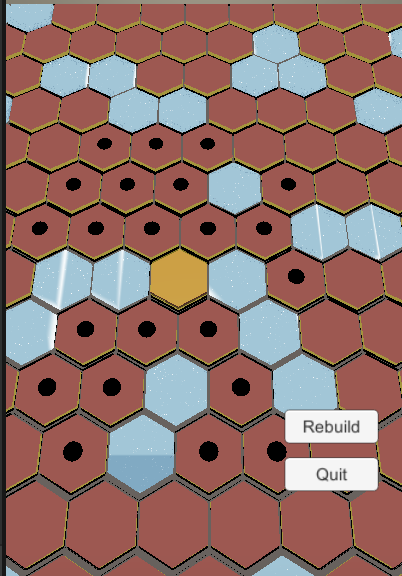
} For my purposes, I looped over the process three times to get “three-levels out” of neighboring tiles and it very nicely supports very non-contiguous grids:
This may sound like an inefficient way to do things, but remember, colliders are deeply integrated with Unity – they are very fast – and the result you get back are essentially plain old GameObjects, so you can help yourself out a bit by tagging things ahead of time to make the evaluation logic in the middle very easy. I could easily see someone spending a lot more CPU cycles on convoluted, inefficient, difficult to understand math path-evaluation algorithms, so I’m not sure either one is “better” or “more correct” then the other. Using collider-based OverlapSpheres does mean that this bit of code looks and works A LOT like the rest of the code being written for the app – to me, that continuity of implementation approach is a big value for long term stability and debugging.
Hope this helps some others out there.